Toy Train Layout Wiring - Troubleshooting
| Basic | Intermediate | Advanced | Wire Management | Bus Wiring | 120V Train Room |
| Glossary | Wire Sizes | Switches | Load Calculations | Soldering | Troubleshooting |
Wiring glitches can be located with a systematic approach.
Here are some methods for specific areas that may be helpful.
General Guidelines - Check First
- Bench test all engines and accessories before installing on a layout.
- Is switch ON?
- Is transformer plugged into a live outlet? Test outlet by plugging in a known good appliance/light.
- Is secondary (low voltage) side of transformer at correct voltage?
- Are connections to transformer tight? Gently tug wires at both ends and secure if loose.
Light Bulbs Melt Stuff or Burn Out too Fast
- Does the supply voltage match the lamp voltage?
- An incandescent lamp rated for 24V powered with 18V will run cooler and last longer.
- Older passenger cars may have 14V bulbs and running on 18V track will cause overheating. Use 24V bulbs or LED lighting.
Full Wave Rectifier for Converting AC to DC Power
This wired bridge rectifier is handy for testing DC motors and circuits. With most of the available AC voltage available in the Run Room it is frequently difficult to acquire a low enough AC voltage.
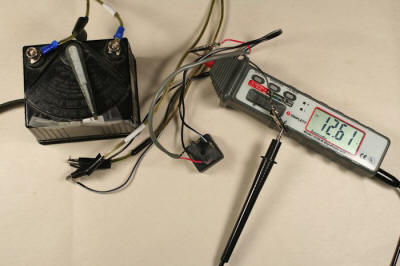 |
The photo to the left shows the bridge rectifier connected between the transformer set at 14 AC volts and the meter showing 12.61 DC volts. |
Wiring
Diagram for Bridge Rectifier at Right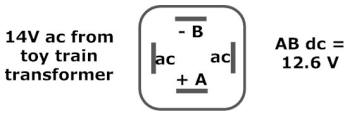 This rectifier is from a scrap box and probably rated at a minimum of 12 Amp 50 Volt. |
 |
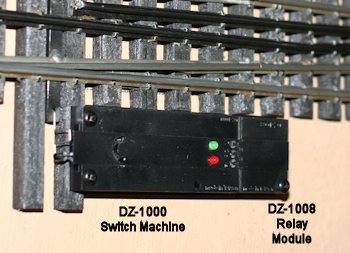
Z-Stuff DZ-1000 Switch Machines
| The Z-Stuff switch machines used with Ross
Custom Switches in the Run Room have performed very well.
When one doesn't perform well an index card with the
following Troubleshooting Sequence is helpful. Hints The flat side of an LED rim should be against the flat edge of the round LED socket. Unplug the relay, if present, before troubleshooting. |
 |
Troubleshooting Sequence for DZ 1000 Switch
Machines
(wired for non-derailing)
1. Detach control arm/wire. Test mechanism.
See test tool below.
2. Check continuity between control rails.
(must be NO continuity when control rails
are disconnected from all other wiring)
A metal "hair" from a new engine can
short the control rails. Use a flashlight.
3. Vacuum the switch and switch machine.
Lube switch machine mechanism
at slot with graphite powder.
(apply powder with
brush for ease of application)
Perform these three steps before
getting into the wiring or mechanisms
themselves>
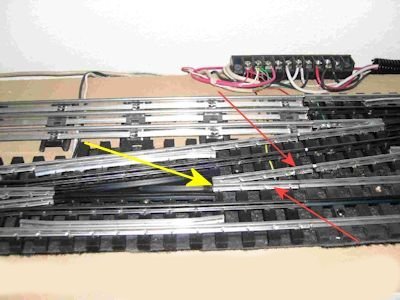 |
The two red arrows indicate the control rails for
non-derailing. The yellow arrow indicates the point where the control rails are most frequently shorted together. In the Run Room all the control rails are insulated at this point with hot glue. |
Test Tool for Non-Derailing Turnouts
Control Rail Trip Tool
#16 solid wire with red insulation trips the powered switch machine
at the switch location.
Trip switch
to diverge from straight path.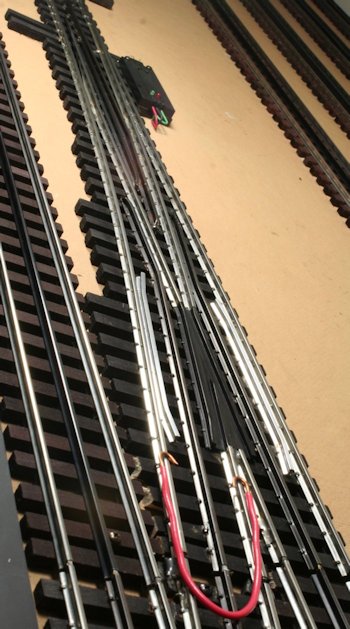 |
Trip
switch to travel straight path.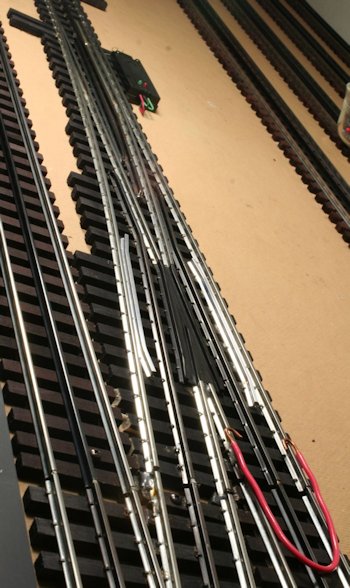 |
Transformer or Control Box Overheating and/or Smoking
If a transformer or control box gets too hot to hold your hand on it, there's a hazard that needs to be identified.
Transformer Check List
- When more than one transformer is in use, are all transformers phased? See Phasing Transformers
- Test breaker by shorting between common and variable voltage terminals with a #16 or larger wire or a screwdriver. If breaker doesn't trip, toss or repair transformer.
- Is wiring hot? When wire is hot it's too small for the load. See Wire Size Uses.
- Tug on connections between transformer and controller to be sure they are tight.
- Protect the variable voltage line from transformer to control box with circuit protection.
Controller Check List
- Check transformer feeding controller. (see above)
- Read controller instructions to check fuse or breaker.
- Immediately after an event, check the track joints/connections for overheating. The joints should never overheat. Tighten all loose track joints.
- Tug on connections between controller and track to be sure they are tight.
- Clear track of all rolling stock and anything that will conduct electricity. Apply power. If that cures the situation add one car/engine at a time. Apply power after each addition to identify the culprit.
- Protect the variable voltage line from controller to track with circuit protection.
The MTH DCS Signal is Weak in Places
See Filter for MTH-Controlled (DCS) Model Train Layouts
| Question? Contact the SSPRR COO (Chief Operating Officer) using the email button to the right. (If email link is absent, please enable JavaScript.) |
|